Showing posts with label Inkwell Press. Show all posts
Showing posts with label Inkwell Press. Show all posts
Thursday, April 7, 2016

Sunday, April 3, 2016
15 Minute Dashboard
Hi everyone, it's Jes here. Have you ever been in a crafting mood, but only had fifteen minutes to spare? Most of the time I just end up waiting till I have time to sit down and work. But sometimes, when I'm stressed, taking that little tiny bit of me time and making something pretty, makes all the difference in my day.
I'm going to show you how I made a fun dashboard for my planner in just a few short minutes. The fun thing about this smaller dashboard is that it can easily become a card when I am ready for a change in my planner.


I'm going to show you how I made a fun dashboard for my planner in just a few short minutes. The fun thing about this smaller dashboard is that it can easily become a card when I am ready for a change in my planner.

You'll need: A fun piece of paper cut down to card size. Mine is 4.25 x 5.5. Stamps of your choice, embossing powder, a heat tool, embossing ink, and clips for your planner.

Ink up your stamp and stamp it on your paper. I love my Fiskars Stamp Press for lining things up just right.

Cover the image generously with embossing powder. I find that if I fold a piece of printer paper and give it a good crease, before opening it up to emboss on it, it is much easier to pour the powder back in the jar.

Once you've tapped off the excess powder and put it back in the jar, heat set your project till the embossing powder melts.

I used a tombow marker and a water brush to add a super fast color wash to my piece because I thought it looked boring.

It was still missing a little something, and I decided to add my April motto to the card, "Dare To Dream" using the Mixed Alpha stamp set from Sweet Stamp Shop.

Finally, I added my Spiral Snaps and slipped it into my planner. All total the project took me eighteen minutes, and that includes digging out supplies, and taking photographs.


Supply List:
Stamps- Mixed Alpha and Across the Miles from Sweet Stamp Shop
Ink - Versamagic
Stamp Press - Fiskars
Spiral Clips - Spiral Snaps
Embossing Powder - Mine is from Michaels
Sunday, March 27, 2016
Good morning from Kristine, all! (And for those who celebrate it, Happy Easter!) I've got another PWM video for you today, for the the week of March 28 through April 3. (YOU GUYS - where the heck did the first three months of the year go?????)
All sources are posted at the end of the video. Please let us know if you have any questions or comments - we LOVE getting your feedback!
Hope you all have a great week! Mwah!
All sources are posted at the end of the video. Please let us know if you have any questions or comments - we LOVE getting your feedback!
Hope you all have a great week! Mwah!
Sunday, March 13, 2016
Good morning from Kristine, and happy Sunday! Today is the day we "sprung forward," and while I'm happy that it means spring is practically here, I'm always a bit unsettled to lose an hour out of the day. Who would think that a measly hour would have such an impact??
Well, Sunday means we've got more planner layouts for you. Below is a link to my second-ever Plan With Me video. I streamlined the process a little, so it's a little shorter than last time, and there aren't as many cuts and jumps. I also tried a new camera set-up, which resulted in a little unintended camera shake - I hope that doesn't bother you guys too much, and I'll figure something different out for next time. Always a process, lol!
Anyhoo, here it is. Please feel free to comment and let us know what you think - the good, the bad, and the ugly. We want to get better! Have a great week, everyone!
Well, Sunday means we've got more planner layouts for you. Below is a link to my second-ever Plan With Me video. I streamlined the process a little, so it's a little shorter than last time, and there aren't as many cuts and jumps. I also tried a new camera set-up, which resulted in a little unintended camera shake - I hope that doesn't bother you guys too much, and I'll figure something different out for next time. Always a process, lol!
Anyhoo, here it is. Please feel free to comment and let us know what you think - the good, the bad, and the ugly. We want to get better! Have a great week, everyone!
Sunday, February 28, 2016
Happy Sunday, everyone! It's Kristine with you again today, and I'm sharing my planner spread for next week, February 29 through March 6. I definitely need my planner to be functional, so there is plenty of functional stamping in it, but I also like to decorate it so that it makes me smile each time I look at it. Check out the finished product:

I just adore those dragon stamps from Sweet Stamp Shop, so I was super excited to be able to use them in my layout this week. Let's get started so you can see step by step how I built this layout!
First off, here's what the planner looks like with nothing done to it. I use an Inkwell Press Livewell Planner in the flex (horizontal) layout:






First off, here's what the planner looks like with nothing done to it. I use an Inkwell Press Livewell Planner in the flex (horizontal) layout:

The first thing I usually do each week is choose washi tape. I was very happy to see the teal color scheme for March, as the February pages were all done in a sort of peachy color and I was ready for a switch. I chose some of the washi tape from Michaels' new Boho line and laid down strips to the left of the teal boxes. For me, the washi was a little too wide, so I used a metal ruler and a craft knife to cut it so I could peel half of it off. (If you do this, be very careful not to press to hard with the knife - you don't want to cut through the page, just the washi!)

I did that on both pages, then added a coordinating washi tape at the top and bottom of each page, also cutting it to make it a bit thinner. Here's what the spread looks like with all the washi in:

I use my planner for both work and home items, so I like to split the weekdays in half on the days that I have school. I put my work to-do's and appointments on the left, and my home to-do's on the right. To separate each day like this, I use a ruler as a guide and put black dots down the middle of each day's row (note that there are no dots on Tuesday - we don't have school that day because of the primary elections):

Next, I decided to fancy up the dates a little. I used the banner stamp that comes in Sweet Stamp Shop's Dragon set to make new date banners. I stamped those on sticker paper, then cut them out and stuck them down onto some patterned scrapbook paper that coordinates with my color scheme:

Leaving a little border around the outside, I cut those out again and ran them through my Xyron sticker maker:

Then all I had to do was peel them up, stick them over the existing dates in my planner, and write the dates on them in black pen. I think the finished dates definitely coordinate better with my dragon theme!

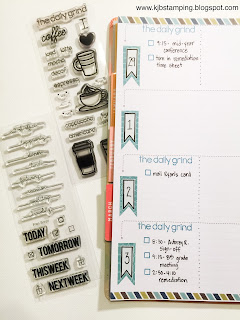
Once the dates were done, it was time to add my functional stamping. On the left side of each day, for my work items, I used a stamp from Sweet Stamp Shop's Cuppa Coffee set to put "the daily grind" at the top. I also used a check box from one of their retired sets to make the to-do boxes (though you could probably use a the check boxes from their Feeling Today set to achieve the same result):

For my home to-do's on the right side of the dotted line, I again used the check box stamp and a stamp from Sweet Stamp Shop's Basic Tabs set that I use to track my daily language practice (I'm attempting to learn Italian for an upcoming trip to Rome!). I used the globe from the Plan School set to make it cute. For interest, and to further separate the work and home items, I used two ink colors that coordinated with my washi. Once all those items were stamped, I used a black pen to write in all the to-do and appointment items:

Moving to the right side of the spread, I used one of Sweet Stamp Shop's Weekend Flags stamps and letters from their Mixed Alpha set to create my weekend banner:

I used the same stamp sets as on the left side of the spread to put my to-do's in for Saturday and Sunday, also adding in stamps from the Plan Craft, Plan Fitness, and Plan to Eat sets. (Since I do many of the same items both days, I found it was easier to stamp each activity once and put two check boxes next to it - one for Saturday and one for Sunday. This has really saved space in my layout!)

To finish off my functional stamping, I used icons from Studiol2e in the top two teal boxes each day. In the top box, I track the steps of my skincare routine. For that, I used the little banners from the List It set (four banners, one for each step - as I complete them morning and night, I check them off). In the center box, I track chores I need to do that day. For those, I used a variety of icons from the Iconic and Iconic Activities sets. In my bottom teal box, I like to write in a few short words each evening to describe how my day was. For this, I used the "today" stamp from Sweet Stamp Shop's Title Script set. Here's how the spread looks once all my functional stamping is done:

Now comes the fun part: filling in the cracks with some decorative stamping! I knew that I wanted to use the stamps from Sweet Stamp Shop's Dragon set, but I decided to add a little twist by paper piecing my dragons to add pattern to the dragons' bellies and wings. To start, I chose two coordinating papers and some white sticker paper and stamped the dragon three times:
\

Next, I cut around the sticker dragon and then cut off his wings and cut out his belly. I have to admit, this part was a bit nerve-wracking!

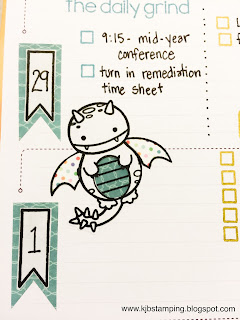
I cut off the wings from the polka dot dragon and cut out the belly from the teal dragon, then pieced those parts together with the sticker dragon. I dry fit them first to make sure they'd look okay. Omg, you have no idea how happy I was to see that this actually worked!!

Once I knew the pieces would fit together all right, I ran the two wings and the belly piece through the sticker maker:

And then I peeled the backing off the main dragon body and stuck all four pieces down in my planner where I wanted the dragon to be:

LOVE!! That dragon made me so happy that I made another one for the other side of the planner spread. The last thing I did was stamp two eggs and some fire (all from the Dragon stamp set) on sticker paper, cut out and stick them all in, and color everything (including the functional icons) with Prismacolor colored pencils blended with gamsol. I added a couple of the sentiment stamps from the Dragon set to complete the look, and voila, it was done!

I can't deny that it took some work to get this layout done, but I also can't deny that I can't WAIT to open up my planner tomorrow and look at this gorgeous spread all week!
I hope you like the paper piecing technique and decide to try it! Please feel free to leave us a comment down below and let us know what you think about this post. And if you do try paper piecing, tag us on Instagram (@teachplancraft, @jes_planning) so we can see your creation. Hope you all have a fantastic week!
Subscribe to:
Posts (Atom)